


I love doing things the hard way, and I wanted a solution for streaming my PoE RTMP Reolink cameras remotely which I have set up as a security solution. It had to be self-contained and low power, and require minimal configuration.
The Hardware
For my Hardware I chose a Banana Pi R64 with 1.3GHz ARM SoC, 1GB RAM, Gigabit Ethernet, SATA + PCIe slots, running OpenWRT .

I chose this over a more standard Linux box because of the following reasons:
- It is low power (I intend to run the setup on solar)
- It can accept an LTE modem for remote access
- I can plug in an SSD or HDD for recording video to
- It has a built-in ethernet switch and WiFi capability
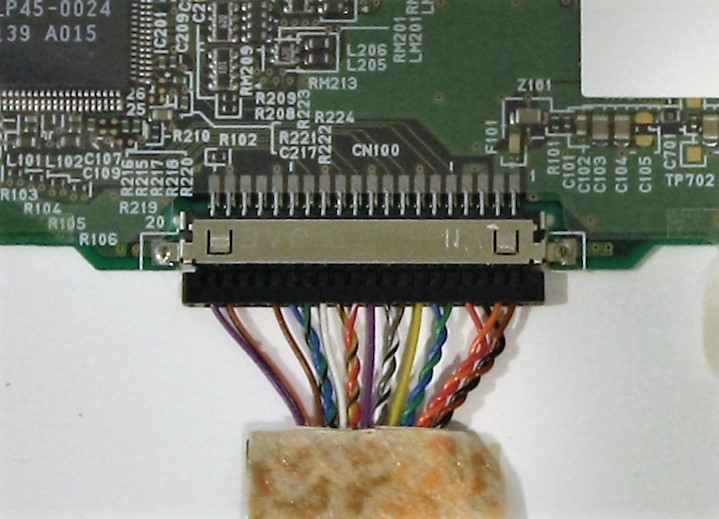
For my cameras I am using Reolink RLC-410/420 as these are relatively low-cost and don’t require any kind of cloud subscription.
The Software
I chose OpenWRT over plain Linux as it provides a great networking / firewalling solution, which means I can easily wall off the cameras from the internet so they can’t communicate out and join the Internet of Shit!
With the Banana Pi, it is able to run docker and handle quite a bit of throughput.
To configure everything I am using Ansible, as it provides me with a repeatable script to set everything up again if I was to lose my hardware, and it serves as valuable documentation as to what I even did on the device. I won’t be covering the Ansible script here, but I can highly recommend it despite the high learning curve!
To actually stream the video, I’m using a little-known plugin to Nginx (nginx-rtmp ) that adds native RTMP support and translates it to HLS/MPEG-TS (the same tech used for Twitch and other real-time streaming platforms!)
Unfortunately this plugin has to be compiled from source, which is where Docker comes into play - Docker provides a repeatable and self-contained environment for building things from scratch.
Building OpenWRT
OpenWRT by default does not come with Docker support, but you can enable it by re-compiling the image.
Fortunately this is fairly easy to do as OpenWRT provide a standalone build environment as part of their image releases for every platform they support!
So, in a local linux environment (eg. WSL2):
- Download the latest openwrt-imagebuilder.tar.xz from downloads.openwrt.org/snapshots
- Extract the imagebuilder package
- Build the image with support for docker (
docker, dockerd, luci-app-dockerman) andluci. I also decided to enable support for wireguard (kmod-wireguard, wireguard-tools, luci-app-wireguard) and external disks (block-mount, fdisk, kmod-fs-ext4, resize2fs)
# HACK: WSL2 appends windows paths, which breaks the makefile
PATH=/usr/local/sbin:/usr/local/bin:/usr/sbin:/usr/bin:/sbin:/bin:/usr/games:/usr/local/games:/usr/lib/wsl/lib

make image PACKAGES="luci docker dockerd kmod-wireguard wireguard-tools luci-app-wireguard luci-app-dockerman python3 block-mount fdisk kmod-fs-ext4 resize2fs"
This will produce an image which can then be copied to an SD card or flashed through the Luci web UI:
~/openwrt-imagebuilder-mediatek-mt7622.Linux-x86_64/bin/targets/mediatek/mt7622/openwrt-mediatek-mt7622-bananapi_bpi-r64-sdcard.img.gz
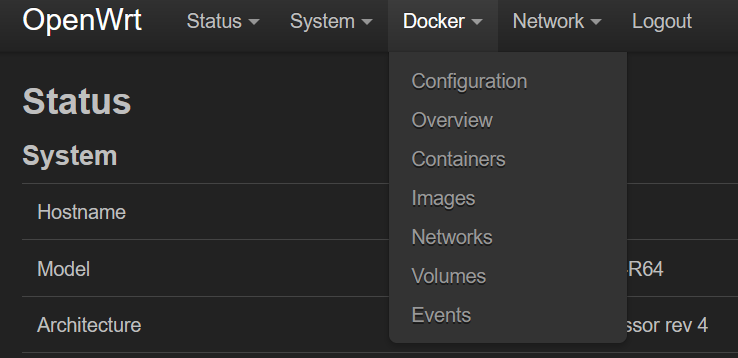
If all goes well, you should see support for docker appear in the OpenWRT interface:
You should then set up an SSH user and lock down the network configuration!
Also consider adding the following line to /etc/sysupgrade.conf to ensure nginx configuration is preserved when you next install an update:
/etc/nginx
Jailing the Cameras
I don’t trust connecting my cameras directly to the internet, for good reason .
Fortunately with OpenWRT we can jail the cameras off into their own subnet which prevents them from accessing the internet, except to obtain time via NTP.
The Banana Pi provides the following network devices:
- wan
- wlan0
- eth0
- eth1
  - lan1
  - lan2
  - lan3
  - lan4
lan1-4 are virtual (tagged) ports sitting behind eth1, and eth0 is the WAN port.
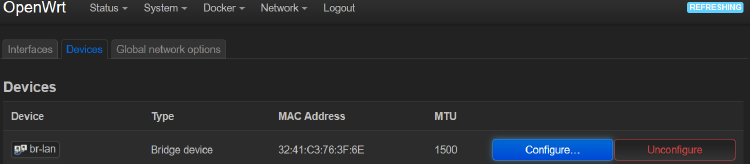
By default, all lan ports are bridged together on br-lan.
So let’s start by removing one on of the switch ports from the bridge: (eg. lan4)
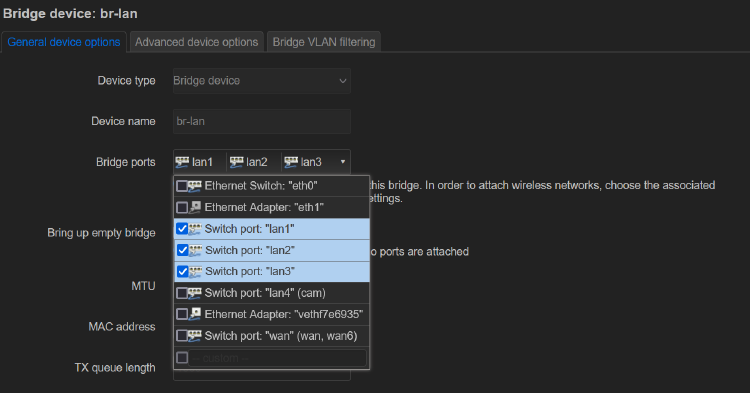
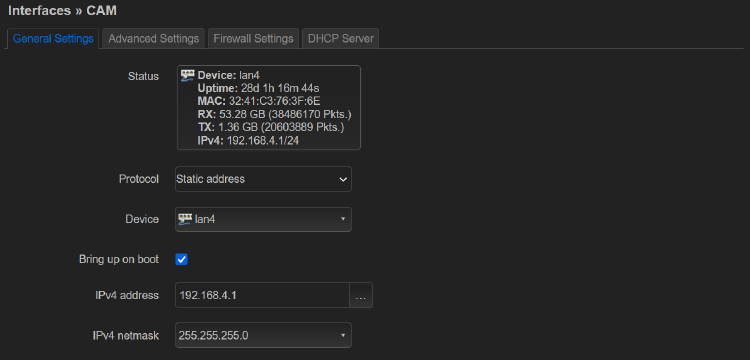
Now add a new interface and assign it to lan4
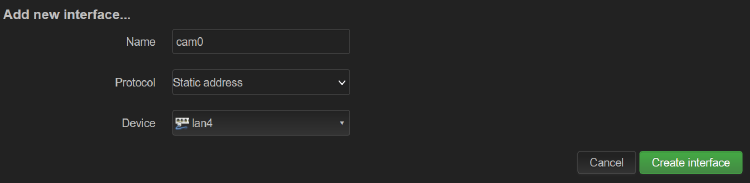
Note that we’re using a static IP configuration, so we can set a custom subnet (make sure this doesn’t collide with your home network!)
We also need to enable the DHCP server so the cameras get IP addresses assigned:
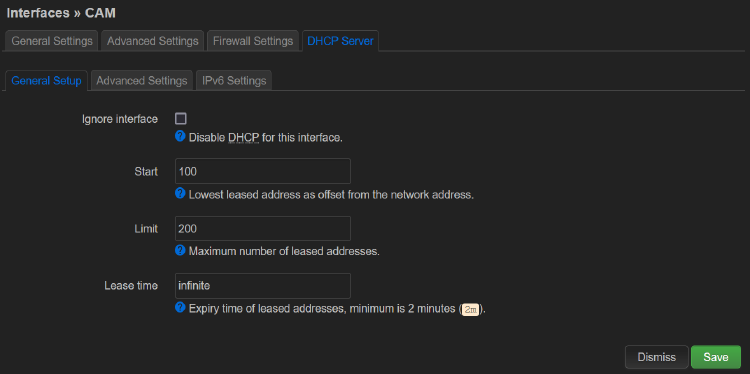
NOTE: Specify an infinite lease time to make sure the IP addresses don’t change or expire.
This makes life easier for the streaming server!
You should now have the following interfaces: CAM (lan4), LAN (br-lan), WAN (wan), WWAN (wlan0), and can now set up the firewall:
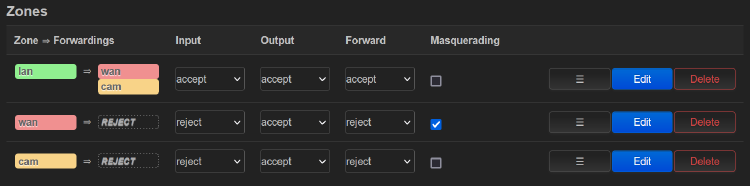
This basically says:
- All traffic from LAN is allowed into WAN (internet) and CAM
- All traffic from WAN is not allowed into LAN or CAM, but can access the web portal / SSH (you may want to disable this!)
- All traffic from CAM is not allowed to access WAN or LAN, but is allowed to access the device itself (for DHCP & NTP)
We also need to set up some Traffic Rules to allow the cameras to obtain a DHCP address and broadcast advertisement information:
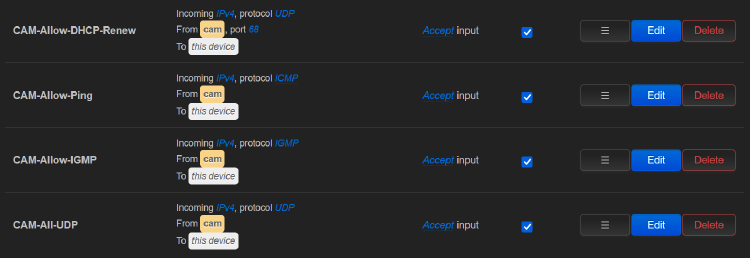
Now restart the router, connect your cameras, and make sure they show up in the OpenWRT Overview page.
Also make sure you can access the cameras through their web interface using their local subnet address. As long as your phone/PC is connected directly to the OpenWRT router, it should have routing information that connects you to the camera subnet.
Compiling Nginx-RTMP
Okay, we now have the cameras jailed away and assigned addresses, and they can be accessed through their web portal, but we now need a way to forward this stream to an external interface in a secure way.
To do this, we need to compile NGINX with RTMP support.
Fortunately, Docker makes this easy, and Nginx provides an official Dockerfile to help:
- Download the dockerfile from GitHub/nginxinc/docker-nginx
- Copy it to the device via SSH. Here’s how I do it through Ansible:
  # Ansible Task
  - name: Copy docker script
    become: yes
    copy:
      src: docker/nginx-rtmp.dockerfile
      dest: ~/nginx-rtmp/Dockerfile
      mode: 'u=rw,g=rw,o=r'
- Build the docker image, being sure to set
ENABLED_MODULES=rtmpin the command-line args.
  # Ansible Task
  - name: Build docker image
    become: yes
    docker_image:
      name: nginx-rtmp
      source: build
      build:
        path: ~/nginx-rtmp
        dockerfile: Dockerfile
        args:
          ENABLED_MODULES: 'rtmp'  # This enables the RTMP plugin
      state: present
- Create a container using the above created image (which will be present in the local image cache)
  # Ansible Task
  - name: Create container
    become: yes                                 # Run as root
    docker_container:
      state: started                            # Start the container after creating it
      restart: yes                              # Restart the container if it was already running
      name: 'nginx'
      image: 'nginx-rtmp:latest'                # The image that we built above
      restart_policy: unless-stopped            # Don't restart the container if it crashes
      #env:
      #  TZ: 'Pacific/Auckland'                 # Optional: Specify the timezone
      volumes:
        - '/home/nginx:/usr/share/nginx/html'   # Mount HTML to local directory
        - /etc/nginx:/etc/nginx                 # Mount configuration to local /etc directory
      mounts:
        - type: tmpfs
          target: /tmp                          # Create a 100MB temporary RAM filesystem
          tmpfs_size: 100M                      # for storing logfiles / buffered video
          #tmpfs_mode:
      ports:
        - '8000:80'                             # Expose web interface on port 8000
        - '1935:1935'                           # Expose mirrored RTMP stream
      oom_killer: yes # yes=disabled            # Disable the out-of-memory killer
The docker container should now appear in the OpenWRT interface:
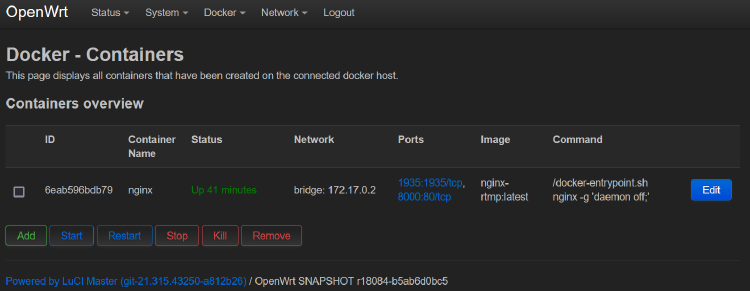
Great! But of course nginx hasn’t been told where to find the cameras yet.
Automatic Discovery
I wanted a way for the device to automatically discover connected cameras so I didn’t have to go in and modify configuration files, as you’d need to know the IP address of each camera when you connect it.
We can rely on the fact we’re running within OpenWRT and that the cameras are assigned DHCP addresses on their subnet -
OpenWRT uses DNSMASQ for the DHCP server, which very handily writes any addresses to /tmp/dhcp.leases.
The leases file looks like this:
root@OpenWrt:~# cat /tmp/dhcp.leases
0 ec:71:db:15:d9:74 192.168.4.223 Camera-15D974 01:ec:71:db:15:d9:74
0 ec:71:db:dc:5e:ba 192.168.4.206 Camera-DC5EBA 01:ec:71:db:dc:5e:ba
DNSMASQ also provides a way to execute a script whenever a new lease is assigned:
root@OpenWrt:~# cat /etc/dnsmasq.conf | grep dhcp-script
dhcp-script=/root/detect_cameras.py
With some python we can parse this file and automatically update the Nginx config when a new lease is assigned!
This will generate a config file with the following format which can be included by nginx:
root@OpenWrt:~# cat /etc/nginx/cameras.conf
pull rtmp://192.168.4.223/bcs/channel0_main.bcs?channel=0&stream=0&user=admin&password=password name=Camera-15D974 static;
pull rtmp://192.168.4.206/bcs/channel0_main.bcs?channel=0&stream=0&user=admin&password=password name=Camera-DC5EBA static;
Nginx Configuration
Now that we have a list of cameras, we need to configure nginx-rtmp in /etc/nginx.conf…
This is as easy as defining an rtmp directive that includes our cameras.conf file generated above,
and specifying the HLS and/or DASH directives to enable conversion of the incoming RTMP stream into
HLS/DASH media fragments (stored in the 100MB temporary ramdisk):
load_module /usr/lib/nginx/modules/ngx_rtmp_module.so;

rtmp {
    # rtmp://host/app_name
    server {
        listen 1935;

        application cam {
            live on;
            include cameras.conf;

            hls on;
            hls_path /tmp/hls;

            dash on;
            dash_path /tmp/dash;
        }
    }
}
We also need to tell nginx how to serve the HLS/DASH fragments via HTTP:
http {
    include       /etc/nginx/mime.types;
    default_type  application/octet-stream;

    server {
        listen 80 default_server;
        listen [::]:80 default_server;

        location /hls {
            # Serve HLS fragments
            types {
                application/vnd.apple.mpegurl m3u8;
                video/mp2t ts;
            }
            root /tmp;
            add_header Cache-Control no-cache;
        }

        location /dash {
            # Serve DASH fragments
            root /tmp;
            add_header Cache-Control no-cache;
        }
    }
}
Restart nginx, and you should now be able to open a video stream through VLC:
# RTMP
rtmp://openwrt:1935/cam/Camera-15D974

# HLS
http://openwrt:8000/hls/Camera-15D974.m3u8

# DASH
http://openwrt:8000/dash/Camera-15D974.ts
For an example of a full config file, see nginx.conf
Web Interface
It would also be great if we could stream the cameras directly from the browser…
This is actually pretty easy to do as well - we can leverage OvenPlayer , and point it to the HLS/DASH URLs:
<!DOCTYPE html>
<html>
    <head>
        <title>Cameras</title>
        <script src="//cdn.dashjs.org/latest/dash.all.min.js"></script>
        <script src="//cdn.jsdelivr.net/npm/hls.js@latest/dist/hls.min.js"></script>
        <script src="//cdn.jsdelivr.net/npm/ovenplayer/dist/ovenplayer.js"></script>
    </head>
    <body>
        <div id="player_id"></div>
        <script>
            const name = "Camera-15D974";
            const player = OvenPlayer.create('player_id', {
                autoStart: true,
                mute: true,         // NOTE: autoStart only works if audo is muted
                controls: true,
                sources: [
                    {
                        "file": `hls/${name}.m3u8`,
                        "label": "hls",
                        "type": "hls"
                    },
                    {
                        "file": `dash/${name}.mpd`,
                        "label": "dash",
                        "type": "dash"
                    }
                ],
            });
        </script>
    </body>
</html>
The downside here is again we need to hard-code the camera names to match the cameras.conf file.
But here I have another trick - nginx-rtmp provides a metadata API for all active streams which
can be enabled by adding the following directive to /etc/nginx.conf:
# /stat isn't reliable when using multiple workers,
# as it will connect to a random worker.
#worker_processes  auto;
worker_processes 1;

http {
    server {
        ...

        # This provides RTMP statistics as XML
        location /stat {
            rtmp_stat all;
        }
Now we can retrieve a list of cameras:
let cameras = [];
const baseUrl = 'rtmp/';

// Must match the nginx-rtmp application name that is pulling the RTMP feeds
const applicationName = 'cam';

// Query /stat to determine list of actively streaming cameras
var xhr = new XMLHttpRequest();
xhr.open('GET', 'stat', true);
xhr.responseType = 'xml';
xhr.overrideMimeType('text/xml');
xhr.onload = function() {
    if (xhr.status == 200) {
        const xml = xhr.responseXML;
        let camIter = xml.evaluate(
            `/rtmp/server/application/name[contains(., "${applicationName}")]/../live/stream/name`,
            xml, null, XPathResult.ANY_TYPE, null);

        while (true) {
            const el = camIter.iterateNext();
            if (!el) break;

            const name = el.textContent;
            console.log(`Camera: ${name}`);
            cameras.push(name);
            addCamera(name);
        }
    }
};
xhr.send();
Apologies for the outdated use of XMLHttpRequest, I’m a firmware engineer!
Final Result
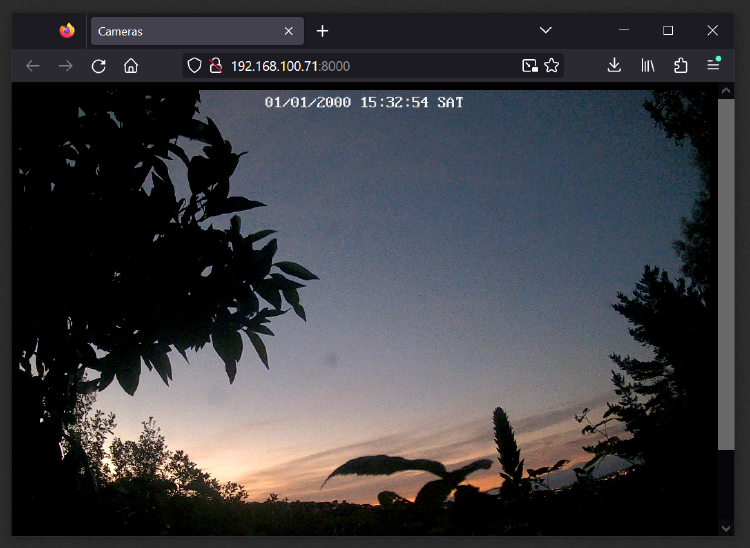
Now when you open the webpage at http://openwrt:8000/, it will automatically discover all active streams
and create separate player elements for each!
Note - if a camera is disconnected or becomes unavailable, nginx-rtmp will stop reporting it via this API,
and so the player element won’t appear for that camera even if it is defined in cameras.conf.
Security Considerations
There are a few security details that still need to be considered:
- If you expose OpenWRT web UI / SSH to the WAN port, you should properly tighten it down with private key auth and a complex admin password
- Docker networks do not respect the OpenWRT firewall (fw3), you’ll need to further tighten it down via iptables
- You may want to enable password authentication on the nginx frontend to protect the privacy of the video streams
- While the security attack surface is reduced since the Reolink web interface is not exposed anymore, you still have to consider the attack surface of nginx-rtmp and OpenWRT.